Ripple Shader
A website animation tutorial featuring a ripple shader effect using React Three Fiber, Next.js and React. Inspired by https://homunculus.jp/ and Yuri Artiukh.

Mask Section Transition
New
Background Image Parallax
New
Text Parallax
New
Sticky Footer
Perspective Section Transition
Text Along Path
SVG Path On Scroll
Horizontal Section
Zoom Parallax
Parallax Scroll
Horizontal Scroll
Text Gradient Scroll Opacity v2
Cards Parallax
3D perspective Scroll
SVG Mask Scroll
Smooth Parallax Scroll
Smooth Scroll
Pixel Transition
SVG Morph
Sliding Stairs Menu
Floating Image Gallery
Project Gallery Mouse Hover
Text Gradient Opacity On Scroll
Svg Curve Loading
Text Clip Mask On Scroll
Image slide project gallery
Mouse Image Gallery
Pixel Cursor Trailing
Text Mask Animation
3D Perspective Text
Project Gallery Colored Card
Cartoon Cursor Trailing

Olivier Larose
September 13, 2023
/
Beginner
/
Medium
A web animation featuring a 3D cube, animated on scroll, mouse move and on drag, using Three.js, react three fiber, Next.js and Framer Motion.
Live DemoSource codeVideo Tutorial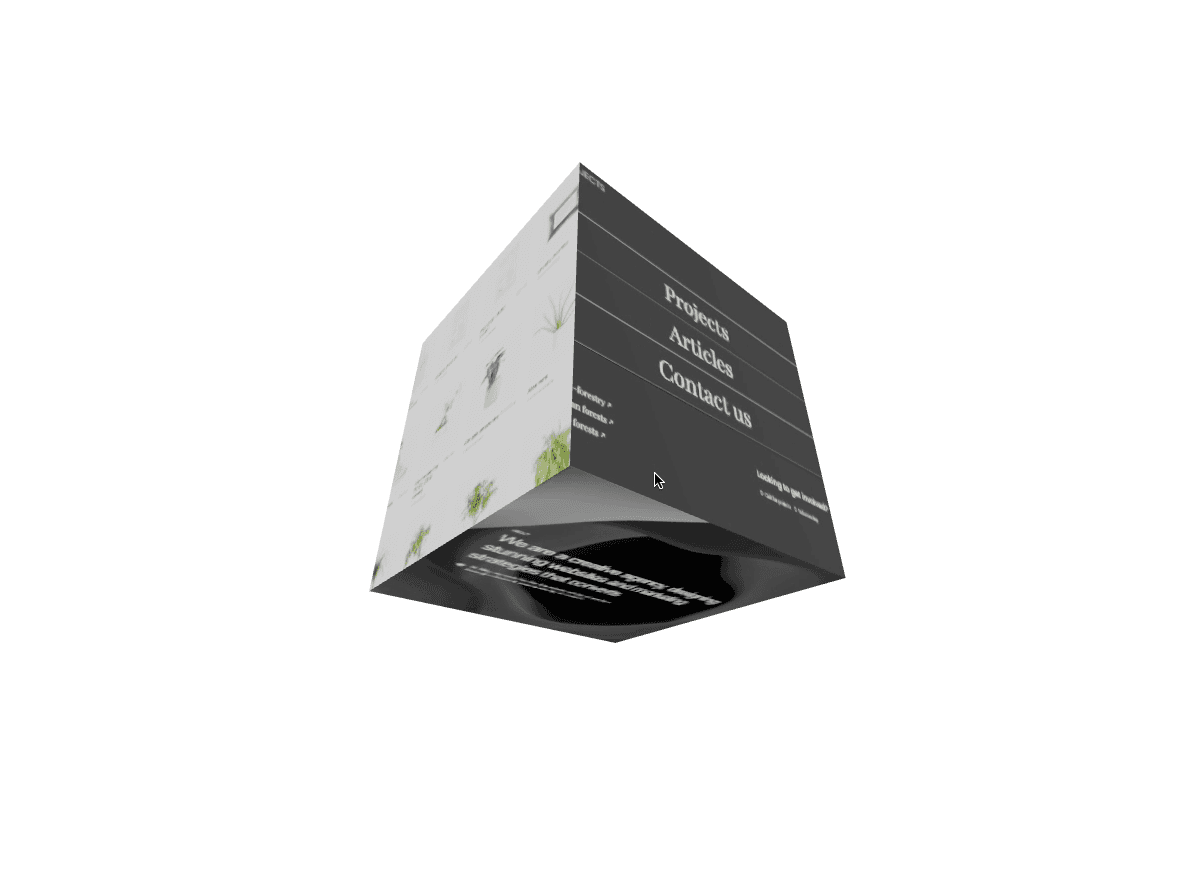
Let's start the project by creating a Next.js application. We can do that by running npx create-next-app@latest client inside of a terminal.
We can delete everything in the page.js , global.css and page.module.css and add our own HTML and CSS, to start with a nice blank application.
npm i sass.npm i framer-motion.npm i framer-motion-3d.npm i @react-three/fiber.npm i @react-three/drei.page.js
1
import Cube from '@/components/cube';2
3
export default function Home() {4
return (5
<Cube />6
)7
}
The first thing we need to create a 3d scene is the <Canvas>. Everything inside of it will be translated into a Three.js component. For example, the <mesh> is translated into a Three.js Mesh, same thing for the ambient light and the directional light.
componen...
cube/sty...
1
'use client';2
import React, { useRef } from 'react'3
import { Canvas, useFrame, useLoader } from '@react-three/fiber';4
import { TextureLoader } from 'three/src/loaders/TextureLoader';5
import styles from './style.module.scss';6
7
export default function index() {8
9
return (10
<div className={styles.main}>11
<div className={styles.cube}>12
<Canvas>13
<ambientLight intensity={2}/>14
<directionalLight position={[2, 1, 1]}/>15
<Cube/>16
</Canvas>17
</div>18
</div>19
)20
}21
22
function Cube() {23
24
const mesh = useRef(null);25
26
useFrame((state, delta) => {27
mesh.current.rotation.x += delta * 0.1528
mesh.current.rotation.y += delta * 0.1529
mesh.current.rotation.z += delta * 0.1530
})31
32
const texture_1 = useLoader(TextureLoader, '/assets/1.jpg')33
const texture_2 = useLoader(TextureLoader, '/assets/2.jpg')34
const texture_3 = useLoader(TextureLoader, '/assets/3.jpg')35
const texture_4 = useLoader(TextureLoader, '/assets/4.jpg')36
const texture_5 = useLoader(TextureLoader, '/assets/5.jpg')37
const texture_6 = useLoader(TextureLoader, '/assets/6.jpg')38
39
return (40
<mesh ref={mesh}>41
<boxGeometry args={[2.5, 2.5, 2.5]}/>42
<meshStandardMaterial map={texture_1} attach="material-0"/>43
<meshStandardMaterial map={texture_2} attach="material-1"/>44
<meshStandardMaterial map={texture_3} attach="material-2"/>45
<meshStandardMaterial map={texture_4} attach="material-3"/>46
<meshStandardMaterial map={texture_5} attach="material-4"/>47
<meshStandardMaterial map={texture_6} attach="material-5"/>48
</mesh>49
)50
}
Couple notes about the code above:
useFrame hook (which is called at every single frame) from react-three-fiber.attach="material-x"We can easily rotate the cube with a drag event using the <OrbitControl> by react-three/drei.
For this specific animation, I want to toggle off the zoom and the pan options for the Orbit Controls, so I specify false for their distinct props.
components/cube/index.jsx
1
return (2
<div className={styles.main}>3
<div className={styles.cube}>4
<Canvas>5
<OrbitControls enableZoom={false} enablePan={false}/>6
<ambientLight intensity={2}/>7
<directionalLight position={[2, 1, 1]}/>8
<Cube/>9
</Canvas>10
</div>11
</div>12
)
To rotate the cube on mouse move, I'll use the Framer Motion library. I'll specifically use Motion Values, to avoid re-rendering the cube at each mouse move event.
components/cube/index.jsx
1
import { useMotionValue, useSpring } from 'framer-motion';2
import { motion } from 'framer-motion-3d'3
4
...5
6
const options = {damping: 20}7
8
const mouse = {9
x: useSpring(useMotionValue(0), options)10
y: useSpring(useMotionValue(0), options)11
}12
13
const manageMouseMove = (e) => {14
const { innerWidth, innerHeight } = window;15
const { clientX, clientY } = e;16
const multiplier = 0.5;17
const x = (-0.5 + clientX / innerWidth) * multiplier;18
const y = (-0.5 + clientY / innerHeight) * multiplier;19
mouse.x.set(x)20
mouse.y.set(y)21
}22
23
useEffect( () => {24
window.addEventListener('mousemove', manageMouseMove)25
return () => window.removeEventListener('mousemove', manageMouseMove)26
}, [])27
28
return (29
<motion.mesh ref={mesh} rotation-x={mouse.y} rotation-y={mouse.x}>30
...
Couple notes about the code
useMotionValue has an internal state, so setting a new value does not re-render the full component, which is good for performance.useSpring hook is used to smooth out the animaiton.There are 2 ways of rotating the cube on scroll. There's an easy way and a harder way, but the harder is also more versatile.
ScrollControls from react-three/drei.useScroll hook from Framer Motion.With the Scroll Controls from react-three/drei, we can wrap all of our content inside a <ScrollControls> which will create a fake scrolling section for us, we can then set the length of that scroll using pages=x props.
page.js
1
return (2
<div className={styles.main}>3
<div className={styles.cube}>4
<Canvas>5
<ScrollControls pages={10}>6
...
components/cube/index.jsx
1
function Cube() {2
3
const data = useScroll();4
5
useFrame( () => {6
const { offset } = data;7
mesh.current.rotation.x = offset * 58
mesh.current.rotation.y = offset * 59
mesh.current.rotation.z = offset * 510
})11
...
We can do something similar as the ScrollControls, but in a more versatile way.
The first step is to use HTML and CSS to create the scrolling section.
After that we can use a mix Framer Motion's hook to make it happen:
Here we can create the scrollable section using CSS:
components/cube/style.module.scss
1
.main{2
height: 500vh;3
4
.cube{5
position: sticky;6
top: 0;7
height: 100vh;8
}9
}
components/cube/index.jsx
1
...2
import { useMotionValue, useSpring, useScroll, useTransform } from 'framer-motion';3
export default function index() {4
5
const container = useRef(null);6
const { scrollYProgress } = useScroll({7
target: container,8
offset: ["start start", "end end"]9
})10
const progress = useTransform(scrollYProgress, [0, 1], [0, 3])11
const smoothProgress = useSpring(progress, {damping: 20});12
13
return (14
<div ref={container} className={styles.main}>15
<div className={styles.cube}>16
<Canvas>17
...18
<Cube progress={smoothProgress}/>
Couple notes about the code:
scrollYProgress returns a value between 0 and 1, which is the progress of the scroll inside the container ref.progress returns a value between 0 and 3, which is the scrollYProgress transformed into new values.smoothProgress returns a smoothed out value of the progress.Then the smooth progress and given to the cube and used as the rotation value.
components/cube/index.jsx
1
function Cube({progress}) {2
...3
return (4
<motion.mesh ref={mesh} rotation-x={progress} rotation-y={progress}>
We're offically done with this animation!
With all of these tricks, I'm pretty confident you can animate any 3D shapes. Hope you learned something!
-Oli
April 21, 2024
A website animation tutorial featuring a ripple shader effect using React Three Fiber, Next.js and React. Inspired by https://homunculus.jp/ and Yuri Artiukh.

April 21, 2024
A website tutorial featuring a bulge distortion animation, made with a shader in GLSL, using React Three Fiber, Next.js and React.
April 18, 2024
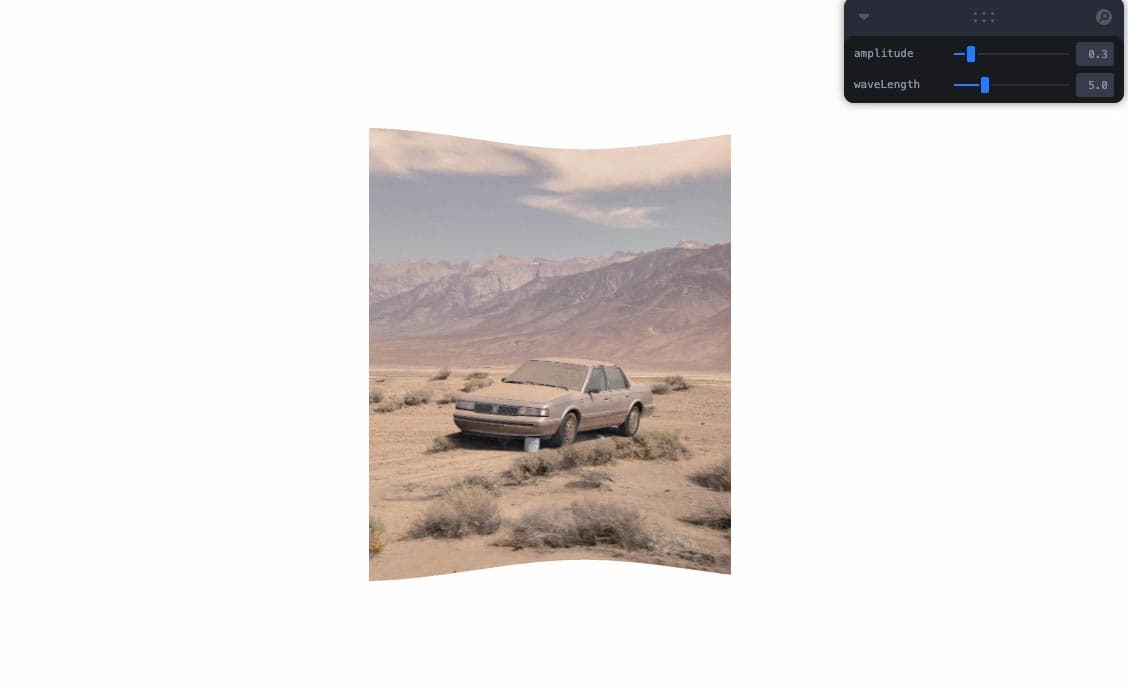
A website animation tutorial featuring a vertex shader with a wave animation applied on a plane. Made with React-three-fiber, Framer Motion and Next.js