Ripple Shader
A website animation tutorial featuring a ripple shader effect using React Three Fiber, Next.js and React. Inspired by https://homunculus.jp/ and Yuri Artiukh.

Mask Section Transition
New
Background Image Parallax
New
Text Parallax
New
Sticky Footer
Perspective Section Transition
Text Along Path
SVG Path On Scroll
Horizontal Section
Zoom Parallax
Parallax Scroll
Horizontal Scroll
Text Gradient Scroll Opacity v2
Cards Parallax
3D perspective Scroll
SVG Mask Scroll
Smooth Parallax Scroll
Smooth Scroll
Pixel Transition
SVG Morph
Sliding Stairs Menu
Floating Image Gallery
Project Gallery Mouse Hover
Text Gradient Opacity On Scroll
Svg Curve Loading
Text Clip Mask On Scroll
Image slide project gallery
Mouse Image Gallery
Pixel Cursor Trailing
Text Mask Animation
3D Perspective Text
Project Gallery Colored Card
Cartoon Cursor Trailing

Olivier Larose
April 18, 2024
/
Advanced
/
Medium
A website animation tutorial featuring a vertex shader with a wave animation applied on a plane. Made with React-three-fiber, Framer Motion and Next.js
Live DemoSource code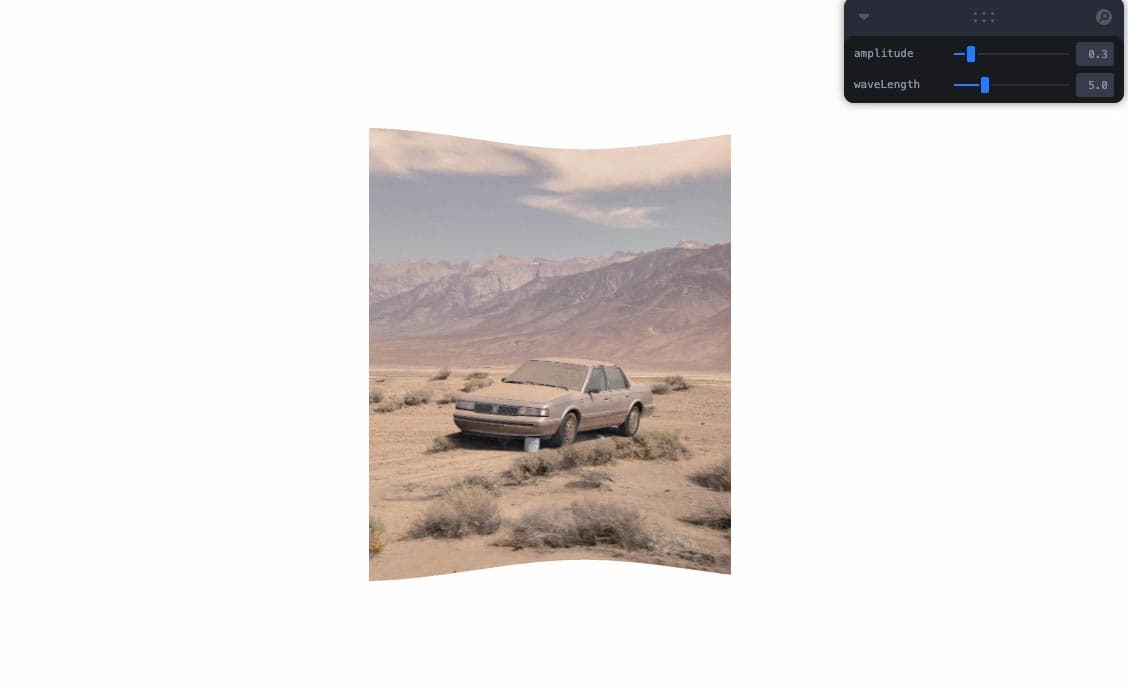
Let's start the project by creating a Next.js application. We can do that by running npx create-next-app@latest client inside of a terminal.
We can delete everything in the page.js , global.css and page.module.css and add our own HTML and CSS, to start with a nice blank application.
npm i three @react-three/fiber.npm i @react-three/drei.npm i framer-motion.For the scene, I'm creating an external component that I'm lazy loading using the Dynamic import, which is a Next.js built in function.
page.js
1
import styles from './page.module.css'2
import dynamic from 'next/dynamic'3
4
const Scene = dynamic(() => import('@/components/Scene'), {5
ssr: false,6
})7
8
export default function Home() {9
return (10
<main className="h-screen">11
<Scene />12
</main>13
)14
}
Note: Here I use the ssr: false option to force the component to strictly be rendered client-side.
Here I'm creating a React Three Fiber Canvas and inside of it I'm adding an external Model Component where I'll render the 3D models.
Scene.jsx
1
import { Canvas } from '@react-three/fiber'2
import React from 'react'3
import Model from './Model'4
5
export default function Scene() {6
return (7
<Canvas>8
<Model/>9
</Canvas>10
)11
}
We'll start by adding a 2D plane with some distortion with a custom shader and then we'll later add the image as a texture on top of it. For now I'm adding a regular plane with a certain scale.
Model.jsx
1
import React from 'react'2
3
export default function Model() {4
return (5
<mesh scale={[3, 3, 1]}>6
<planeGeometry args={[1, 1, 15, 15]}/>7
<meshBasicMaterial wireframe={true} color="red"/>8
</mesh>9
)10
}

To add a wave distortion, the first thing we need to understand is the structure of a wave:

We'll play with two parameters of the wave:
To do that, we need to create a custom shader material and distort the vertices of the plane. We can actually use the Sine function, which is very similar to a wave pattern:
I found that the Sine function is used a lot in web animations, so don't shy away from it even tho it might be scary at first. Basically, there are 2 important things to know about the Sine function for this specific animation:
-1 and 11 when we give it π/2
Like I said earlier, we will play with the amplitude and the wavelength, so for that we can use the Leva library to store parameters and change them on the fly with a GUI.
Wave configs
1
import { useControls } from 'leva';2
3
const { amplitude, waveLength } = useControls({4
amplitude: { value: 0.25, min: 0, max: 2, step: 0.1 },5
waveLength: { value: 5, min: 0, max: 20, step: 0.5 },6
})
Now that we have our 2 parameters ready, we can create a custom shader where we'll use the Sine function to modify the amplitude and the wavelength.
Wave distortion function
1
...2
import { fragment, vertex } from './Shader';3
import { useFrame } from '@react-three/fiber';4
5
export default function Model() {6
7
const image = useRef();8
9
const { amplitude, waveLength } = useControls({10
amplitude: { value: 0.25, min: 0, max: 2, step: 0.1 },11
waveLength: { value: 5, min: 0, max: 20, step: 0.5 },12
})13
14
const uniforms = useRef({15
uTime: { value: 0 },16
uAmplitude: { value: amplitude },17
uWaveLength: { value: waveLength }18
})19
20
useFrame( () => {21
image.current.material.uniforms.uTime.value += 0.04;22
image.current.material.uniforms.uAmplitude.value = amplitude23
image.current.material.uniforms.uWaveLength.value = waveLength;24
})25
26
return (27
<mesh ref={image} scale={[3, 3, 1]}>28
<planeGeometry args={[1, 1, 15, 15]}/>29
<shaderMaterial30
wireframe={true}31
fragmentShader={fragment}32
vertexShader={vertex}33
uniforms={uniforms.current}34
/>35
</mesh>36
)37
}
Here I'm adding 3 unfiforms that will be passed to the shaders
For now the fragment shader will simply return a red color.
Fragment shader
1
export const fragment = `2
void main() {3
gl_FragColor = vec4(1., 0., 0., 1.);4
}5
`
The vertex takes the 3 uniforms and the sine function to create the wave pattern:
Vertex shader
1
export const vertex = `2
uniform float uTime;3
uniform float uAmplitude;4
uniform float uWaveLength;5
void main() {6
vec3 newPosition = position;7
8
float wave = uAmplitude * sin(position.x * uWaveLength + uTime);9
newPosition.z = position.z + wave;10
11
gl_Position = projectionMatrix * modelViewMatrix * vec4(newPosition, 1.0);12
}13
`
Here I'm creating a float value for the wave. I use the x position of each vertices inside the sin function to create the wave pattern. I then use that wave value and add it to the z position of each vertices.
uWaveLength with the x position of each vertices to create the length of each wave.uTime to the sin function to make each wave 'move'.uAmplitude, to accentuate the height of the wave.wave variable and add it to the z position of each vertices.To add the image to the plane, we simply need to create a texture from that image and pass it to the fragment shader:
Here I'm using two methods from react-three/drei:
useTexture: Extract the texture from an imageuseAspect: Calculates an aspect ratio to make an image fill the screen (similar to image-size: cover). Here I reduce the scaling factor so the image does not take the full screenModel.jsx
1
...2
import { useTexture, useAspect } from '@react-three/drei'3
4
export default function Model() {5
6
const texture = useTexture("/images/car.jpg")7
const { width, height } = texture.image;8
9
const scale = useAspect(10
width,11
height,12
0.313
)14
15
const uniforms = useRef({16
uTime: { value: 0 },17
uAmplitude: { value: amplitude },18
uWaveLength: { value: waveLength },19
uTexture: { value: texture },20
})21
22
...23
24
return (25
<mesh ref={image} scale={scale}>26
<planeGeometry args={[1, 1, 15, 15]}/>27
<shaderMaterial28
wireframe={false}29
fragmentShader={fragment}30
vertexShader={vertex}31
uniforms={uniforms.current}32
/>33
</mesh>34
)35
}
modified shaders
1
export const vertex = `2
varying vec2 vUv;3
...4
void main() {5
vUv = uv;6
...7
}`8
9
export const fragment = `10
uniform sampler2D uTexture;11
varying vec2 vUv;12
void main() {13
vec4 color = texture2D(uTexture, vUv);14
gl_FragColor = color;15
}`
Now that we've added a wave, we can add an extra effect by scaling the plane to fullscreen on scroll. That's going to require some understanding of scaling the UVs, which is a good exercise.
The firs thing to do is to make the section sticky and track the progress of the scroll:
Scene.jsx
1
import React, { useRef } from 'react';2
import { useScroll } from "framer-motion";3
...4
5
export default function Home() {6
const container = useRef();7
const { scrollYProgress } = useScroll({8
target: container,9
offset: ['start start', 'end end']10
});11
12
return (13
<main>14
<div ref={container} className="h-[300vh]">15
<div className="sticky top-0 h-screen">16
<Scene scrollProgress={scrollYProgress}/>17
</div>18
</div>19
<div className="h-screen"></div>20
</main>21
);22
}
300vh of height.scrollYProgress is a value between 0 and 1.Now that we have a value that represents the progress of the scroll, we can scale the plane and slowly reduce the amplitude based on that.
Scaling the plane
1
import { transform } from "framer-motion"2
import { useFrame, useThree } from '@react-three/fiber';3
import { useTexture, useAspect } from '@react-three/drei'4
...5
6
const scale = useAspect(7
width,8
height,9
0.310
)11
12
const { viewport } = useThree();13
14
useFrame( () => {15
//scale image based on progress of the scroll16
const scaleX = transform(scrollProgress.get(), [0, 1], [scale[0], viewport.width])17
const scaleY = transform(scrollProgress.get(), [0, 1], [scale[1], viewport.height])18
image.current.scale.x = scaleX;19
image.current.scale.y = scaleY;20
21
//animate wave based on progress of the scroll22
const modifiedAmplitude = transform(scrollProgress.get(), [0, 1], [amplitude, 0])23
24
image.current.material.uniforms.uTime.value += 0.04;25
image.current.material.uniforms.uAmplitude.value = modifiedAmplitude26
image.current.material.uniforms.uWaveLength.value = waveLength;27
})28
29
...
scrollProgress is a value between 0 and 1 and I'm using it to scale the image to fullscreen and reduce the amplitude to 0 as we scroll.As you can see, the texture is getting stretched as we scale the plane, so we need to scale them as well:
Scaling the textures
1
const texture = useTexture("/images/car.jpg")2
const { width, height } = texture.image;3
4
const uniforms = useRef({5
...6
vUvScale: { value: new THREE.Vector2(0, 0) },7
})8
9
useFrame( () => {10
//scale image based on progress of the scroll11
const scaleX = transform(scrollProgress.get(), [0, 1], [scale[0], viewport.width])12
const scaleY = transform(scrollProgress.get(), [0, 1], [scale[1], viewport.height])13
image.current.scale.x = scaleX;14
image.current.scale.y = scaleY;15
16
...17
18
//Adjust texture to new scale19
const scaleRatio = scaleX / scaleY;20
const aspectRatio = width / height21
//scale texture inside shader22
image.current.material.uniforms.vUvScale.value.set(1, aspectRatio / scaleRatio)23
24
})
To scale the texture, I need to pass a new uniform vUvScale to the fragment shader. This uniform will hold the new scale of the texture, based on the aspect ratio of the image and the scale ratio of the plane
Adjusted Fragment shader
1
export const fragment = `2
uniform sampler2D uTexture;3
uniform vec2 vUvScale;4
varying vec2 vUv;5
void main() {6
vec2 uv = (vUv - 0.5) * vUvScale + 0.5;7
vec4 color = texture2D(uTexture, uv);8
gl_FragColor = color;9
}10
`
That's it for this tutorial!
Very interesting to see how we can use mathematical function like the sine wave to create an awesome effect! Also interesting to know about the different type of scaling that's required to effectively scale a plane. Hope you learned something!
-Oli
April 21, 2024
A website animation tutorial featuring a ripple shader effect using React Three Fiber, Next.js and React. Inspired by https://homunculus.jp/ and Yuri Artiukh.

April 21, 2024
A website tutorial featuring a bulge distortion animation, made with a shader in GLSL, using React Three Fiber, Next.js and React.

Feb 17, 2024
A website tutorial on how to create a Glass looking Material with distortion by using the MeshTransmissionMaterial with Three.js, React, React Three Fiber and Next.js.