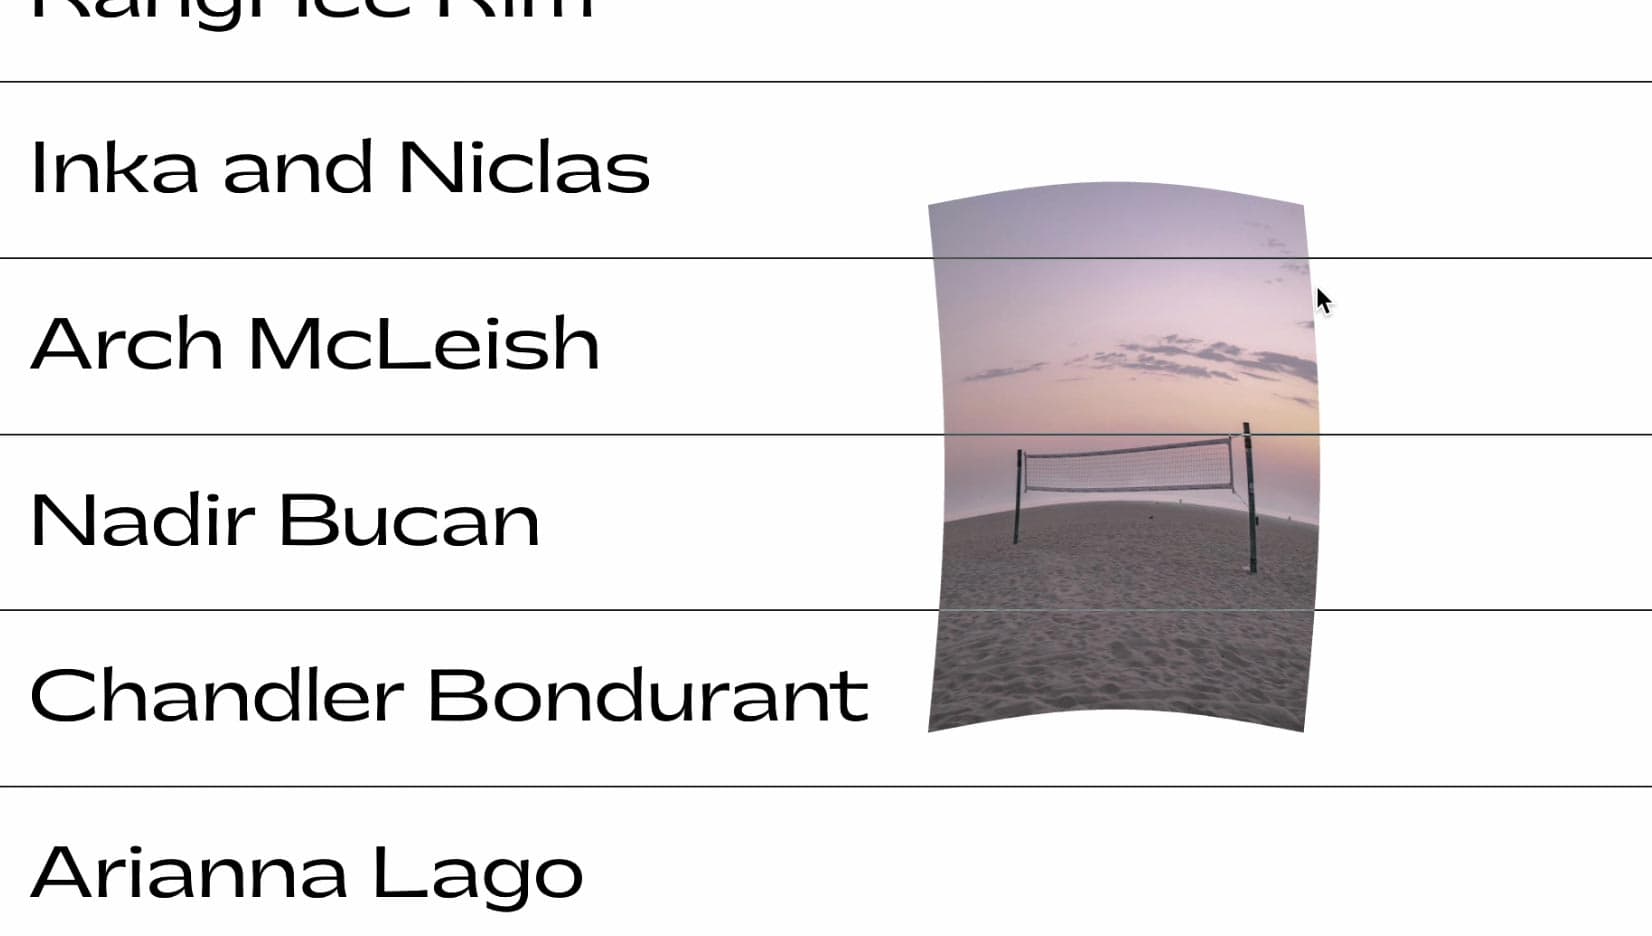
Mouse Image Distortion
A website animation featuring an image distortion in a curved, using the sin function, React, React Three Fiber and Framer Motion

Mask Section Transition
New
Background Image Parallax
New
Text Parallax
New
Sticky Footer
Perspective Section Transition
Text Along Path
SVG Path On Scroll
Horizontal Section
Zoom Parallax
Parallax Scroll
Horizontal Scroll
Text Gradient Scroll Opacity v2
Cards Parallax
3D perspective Scroll
SVG Mask Scroll
Smooth Parallax Scroll
Smooth Scroll
Pixel Transition
SVG Morph
Sliding Stairs Menu
Floating Image Gallery
Project Gallery Mouse Hover
Text Gradient Opacity On Scroll
Svg Curve Loading
Text Clip Mask On Scroll
Image slide project gallery
Mouse Image Gallery
Pixel Cursor Trailing
Text Mask Animation
3D Perspective Text
Project Gallery Colored Card
Cartoon Cursor Trailing

Olivier Larose
May 4, 2024
/
Beginner
/
Short
A website tutorial on making a paint reveal / erasing effect using the destination out blend mode of the canvas API, made with React and Next.js
Live DemoSource code
Let's start the project by creating a Next.js application. We can do that by running npx create-next-app@latest client inside of a terminal.
page.js
1
import Scene from '@/components/Scene';2
import Text from '@/components/Text';3
4
export default function Home() {5
return (6
<main className="flex w-full h-screen items-center justify-center">7
<Text />8
<Scene />9
</main>10
);11
}
The canvas requires that we specify a width and a height to know how many pixels it should be rendering. We can provide it by listening and putting the dimensions of the window inside a state.
useWindow hook
1
import { useEffect, useState } from 'react'2
3
export default function useWindow() {4
const [dimension, setDimension] = useState({width: 0, height: 0})5
6
const resize = () => {7
setDimension({8
width: window.innerWidth,9
height: window.innerHeight10
})11
}12
13
useEffect(() => {14
resize();15
window.addEventListener("resize", resize);16
return () => window.removeEventListener("resize", resize);17
}, [])18
19
return { dimension }20
}
With the dimensions of the window, we can initialize the canvas. I also use the destination-out global composite operation on the canvas so that every time we draw additional shapes on the canvas, it will erase the black rectangle used as a background.
Scene.jsx
1
'use client'2
import React, { useEffect, useRef } from 'react'3
import useWindow from './useWindow'4
5
export default function Scene() {6
const { dimension } = useWindow();7
const canvas = useRef();8
9
useEffect( () => {10
dimension.width > 0 && init();11
}, [dimension])12
13
const init = () => {14
const ctx = canvas.current.getContext("2d");15
ctx.fillStyle = "black";16
ctx.fillRect(0, 0, dimension.width, dimension.height);17
ctx.globalCompositeOperation = "destination-out";18
}19
20
return (21
<div className='relative w-full h-full'>22
{dimension.width == 0 && <div className='absolute w-full h-full bg-black'/>}23
<canvas ref={canvas} height={dimension.height} width={dimension.width}/>24
</div>25
)26
}
The concept to create the brush or paint effect is to draw a bunch of circles everytime we move our mouse. Here's how we can do this:
Scene.jsx
1
const manageMouseMove = (e) => {2
const { clientX, clientY} = e;3
draw(clientX, clientY, 50)4
}5
6
const draw = (x, y, radius) => {7
const ctx = canvas.current.getContext("2d");8
ctx.beginPath();9
ctx.arc(x, y, radius, 0, 2 * Math.PI);10
ctx.fill();11
}12
13
return (14
<div className='relative w-full h-full'>15
...16
<canvas onMouseMove={manageMouseMove} ref={canvas} height={dimension.height} width={dimension.width}/>17
</div>18
)
However, as you can when I move my mouse fast, the brush effect is not smooth, and that's because I move my mouse so fast it's actually skipping the mouse move events and thus not drawing enough circles to create a smooth line.
To smooth out the animation, I'll use a Lerp to fill the gap between every circle that I draw. That way, the animation will be smooth not matter the speed of mouse.

Linear interpolation is a key concept in animations. It is often used by motion designers, but we can also use it for web animations! In short, it is form of interpolation, which involves the generation of new values based on an existing set of values
Lerp in Javascript
1
let value = 10;2
3
const lerp = (x, y, a) => x * (1 - a) + y * a4
value = lerp(value, 0, 0.1);5
6
console.log(value)7
//9
x: The value we want to interpolate from (start)y: The target value we want to interpolate to (end)a: The amount by which we want x to be closer to y.Scene.jsx
1
...2
const prevPosition = useRef(null)3
4
const lerp = (x, y, a) => x * (1 - a) + y * a;5
6
const manageMouseMove = (e) => {7
const { clientX, clientY, movementX, movementY } = e;8
9
const nbOfCircles = Math.max(Math.abs(movementX), Math.abs(movementY)) / 10;10
11
if(prevPosition.current != null){12
const { x, y } = prevPosition.current;13
for(let i = 0 ; i < nbOfCircles ; i++){14
const targetX = lerp(x, clientX, (1 / nbOfCircles) * i);15
const targetY = lerp(y, clientY, (1 / nbOfCircles) * i);16
draw(targetX, targetY, 50)17
}18
}19
20
prevPosition.current = {21
x: clientX,22
y: clientY23
}24
}25
26
const draw = (x, y, radius) => {27
const ctx = canvas.current.getContext("2d");28
ctx.beginPath();29
ctx.arc(x, y, radius, 0, 2 * Math.PI);30
ctx.fill();31
}
Notes about the code:
prevPosition is used to store the previous position of the mouse, which allows us to interpolate between it and the current position.nbOfCircles is based on the speed of the mouse, the faster the mouse, the higher the number of circles requires to draw a smooth line.As simple as this!
A very smooth animation, kind of different than using the DOM to create a web animation. But still the result is nice and it's a sweet animation with good story telling potential. Hope you learned something!
-Oli
June 2, 2024
A website animation featuring an image distortion in a curved, using the sin function, React, React Three Fiber and Framer Motion
March 8, 2024
A website tutorial featuring a moving cursor on mouse move, colored with CSS blend mode difference, made with React and GSAP. Inspired by https://trionn.com/
March 8, 2024
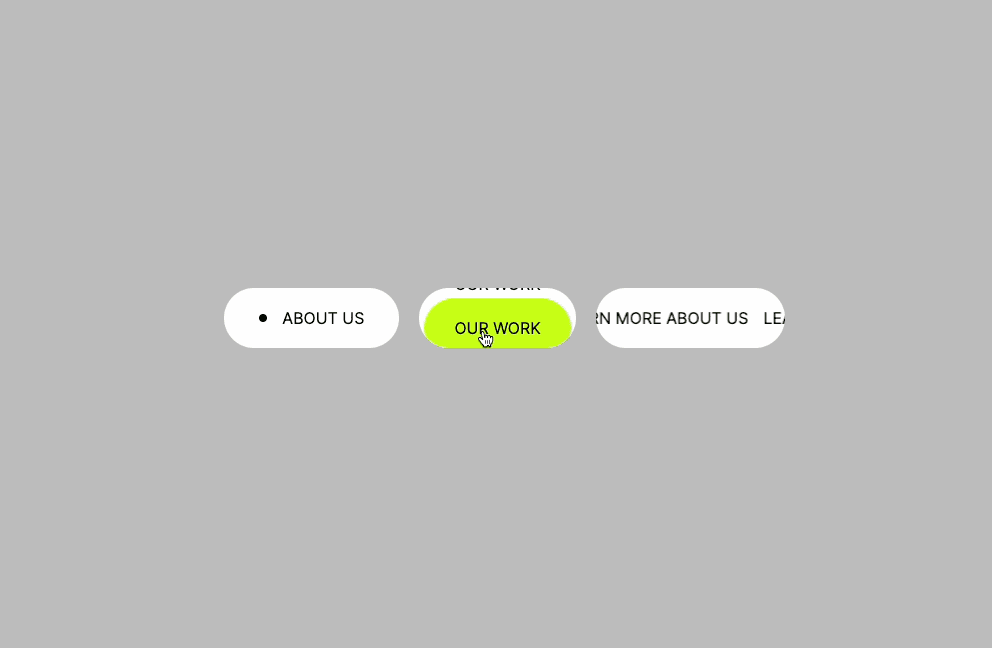
A website tutorial featuring animated buttons taken from awwwards winning websites. Remade using React and SASS. Inspired by https://timestwo.design, https://hello.cuberto.com/ and https://lusion.co/