Awwwards Side Menu
A website tutorial featuring the rebuild of a menu from an Awwwards winning website, made with Framer Motion and Next.js, inspired by: https://agencecartier.com/fr

Mask Section Transition
New
Background Image Parallax
New
Text Parallax
New
Sticky Footer
Perspective Section Transition
Text Along Path
SVG Path On Scroll
Horizontal Section
Zoom Parallax
Parallax Scroll
Horizontal Scroll
Text Gradient Scroll Opacity v2
Cards Parallax
3D perspective Scroll
SVG Mask Scroll
Smooth Parallax Scroll
Smooth Scroll
Pixel Transition
SVG Morph
Sliding Stairs Menu
Floating Image Gallery
Project Gallery Mouse Hover
Text Gradient Opacity On Scroll
Svg Curve Loading
Text Clip Mask On Scroll
Image slide project gallery
Mouse Image Gallery
Pixel Cursor Trailing
Text Mask Animation
3D Perspective Text
Project Gallery Colored Card
Cartoon Cursor Trailing

Olivier Larose
July 4, 2023
/
Intermediate
/
Medium
A website tutorial on how to make an awwwards curved menu using Nextjs, GSAP and Framer Motion. A curve is created using SVG path commands Inspired by https://dennissnellenberg.com/.
Live DemoSource codeVideo Tutorial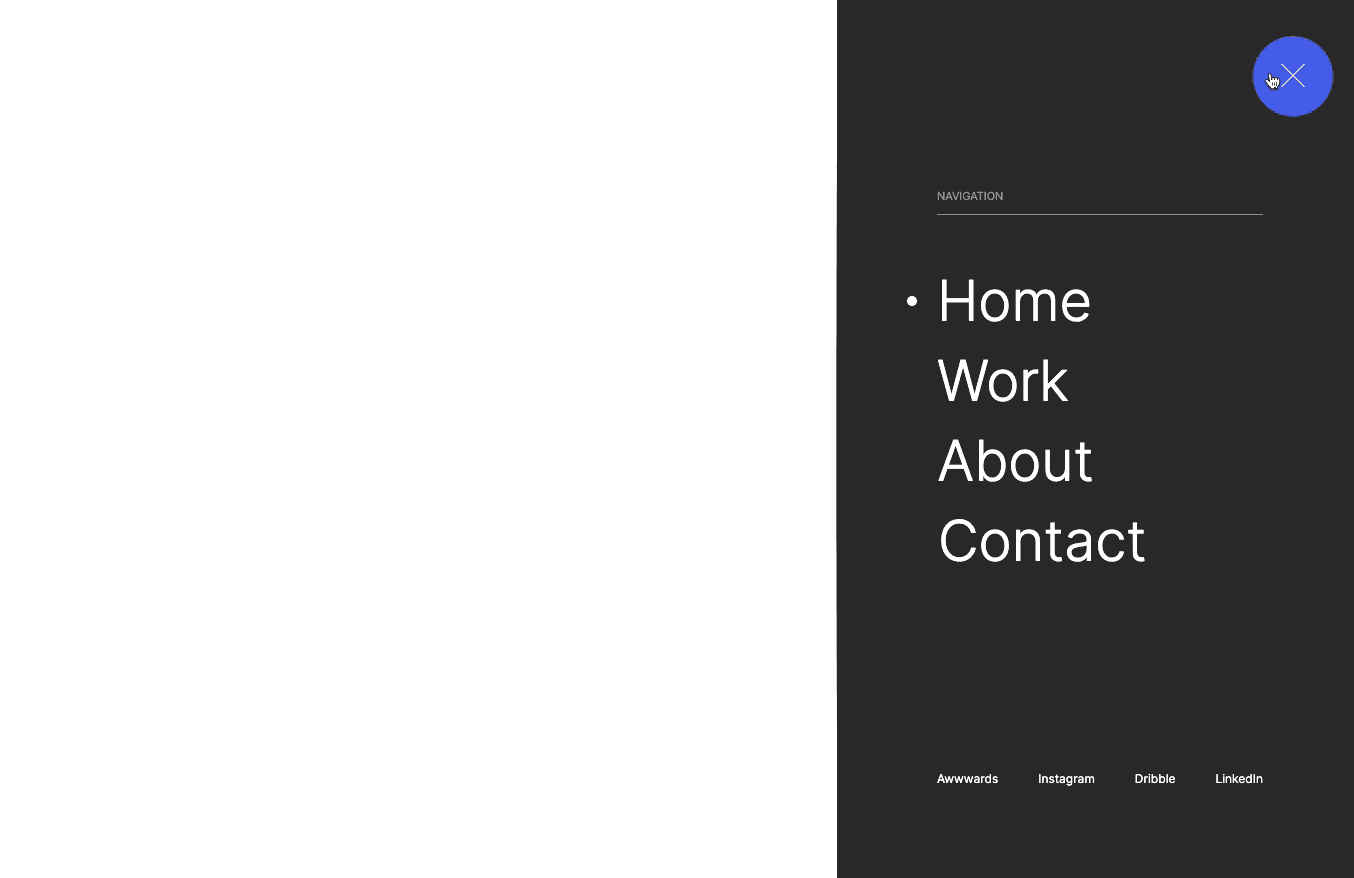
Let's start the project by creating a Next.js application. We can do that by running npx create-next-app@latest client inside of a terminal.
We can delete everything in the page.js , global.css and page.module.css and add our own HTML and CSS, to start with a nice blank application.
npm i sass.The Header Component is imported inside of the layout so it gets persisted accross multiple pages. You can understand that logic with Nextjs component hierarchy:
layout.js
1
import './globals.css'2
import { Inter } from 'next/font/google'3
import Header from '../components/header';4
const inter = Inter({ subsets: ['latin'] })5
6
export const metadata = {7
title: 'Create Next App',8
description: 'Generated by create next app',9
}10
11
export default function RootLayout({ children }) {12
return (13
<html lang="en">14
<body className={inter.className}>15
<Header />16
{children}17
</body>18
</html>19
)20
}21
We create a state to track if the menu is active or not. Then we can toggle a css animation using a conditional class, and use the before and after pseudo elements to create the burger menu.
Header/i...
Header/s...
1
'use client'2
import styles from './style.module.scss'3
import { useState } from 'react';4
5
export default function Home() {6
7
const [isActive, setIsActive] = useState(false);8
9
return (10
<>11
<div onClick={() => {setIsActive(!isActive)}} className={styles.button}>12
<div className={`${styles.burger} ${isActive ? styles.burgerActive : ""}`}></div>13
</div>14
</>15
)16
}
The animations are made with the AnimatePresence components from Framer Motion.
mode="wait" it forces the Nav to trigger its exit animation before unmounting.anim.js file.Header/i...
Header/a...
1
...2
const [isActive, setIsActive] = useState(false);3
4
return (5
<>6
<div onClick={() => {setIsActive(!isActive)}} className={styles.button}>7
<div className={`${styles.burger} ${isActive ? styles.burgerActive : ""}`}></div>8
</div>9
<AnimatePresence mode="wait">10
{isActive && <Nav />}11
</AnimatePresence>12
</>13
)14
I use an array of objects to render the different links. That way, I can use the index to create a cascade animaiton. I also use the usePathname hook and the useState hook to track which link is active.
Nav/inde...
Nav/styl...
1
import React, { useState } from 'react'2
import styles from './style.module.scss';3
import { motion } from 'framer-motion';4
import { usePathname } from 'next/navigation';5
import { menuSlide } from '../anim';6
import Link from './link';7
8
const navItems = [9
{10
title: "Home",11
href: "/",12
},13
{14
title: "Work",15
href: "/work",16
},17
{18
title: "About",19
href: "/about",20
},21
{22
title: "Contact",23
href: "/contact",24
},25
]26
27
export default function index() {28
29
const pathname = usePathname();30
const [selectedIndicator, setSelectedIndicator] = useState(pathname);31
32
return (33
<motion.div34
variants={menuSlide}35
initial="initial"36
animate="enter"37
exit="exit"38
className={styles.menu}39
>40
<div className={styles.body}>41
<div onMouseLeave={() => {setSelectedIndicator(pathname)}} className={styles.nav}>42
<div className={styles.header}>43
<p>Navigation</p>44
</div>45
{46
navItems.map( (data, index) => {47
return <Link48
key={index}49
data={{...data, index}}50
isActive={selectedIndicator == data.href}51
setSelectedIndicator={setSelectedIndicator}>52
</Link>53
})54
}55
</div>56
<div className={styles.footer}>57
<a>Awwwards</a>58
<a>Instagram</a>59
<a>Dribble</a>60
<a>LinkedIn</a>61
</div>62
</div>63
</motion.div>64
)65
}
There's also a Link component to externalize some html and make everything cleaner.
Link/ind...
Link/sty...
1
import styles from './style.module.scss';2
import Link from 'next/link';3
import { motion } from 'framer-motion';4
import { slide, scale } from '../../anim';5
6
export default function Index({data, isActive, setSelectedIndicator}) {7
8
const { title, href, index} = data;9
10
return (11
<motion.div12
className={styles.link}13
onMouseEnter={() => {setSelectedIndicator(href)}}14
custom={index}15
variants={slide}16
initial="initial"17
animate="enter"18
exit="exit"19
>20
<motion.div21
variants={scale}22
animate={isActive ? "open" : "closed"}23
className={styles.indicator}>24
</motion.div>25
<Link href={href}>{title}</Link>26
</motion.div>27
)28
}
To create the curve, I create a custom SVG using path commands:
Framer Motion is used to interpolate from one curve to the next.
Curve/in...
Curve/st...
1
import React from 'react'2
import { motion } from 'framer-motion';3
import styles from './styles.module.scss';4
5
export default function Index() {6
7
const initialPath = `M100 0 L100 ${window.innerHeight} Q-100 ${window.innerHeight/2} 100 0`8
const targetPath = `M100 0 L100 ${window.innerHeight} Q100 ${window.innerHeight/2} 100 0`9
10
const curve = {11
initial: {12
d: initialPath13
},14
enter: {15
d: targetPath,16
transition: {duration: 1, ease: [0.76, 0, 0.24, 1]}17
},18
exit: {19
d: initialPath,20
transition: {duration: 0.8, ease: [0.76, 0, 0.24, 1]}21
}22
}23
24
return (25
<svg className={styles.svgCurve}>26
<motion.path variants={curve} initial="initial" animate="enter" exit="exit"></motion.path>27
</svg>28
)29
}
We're offically done with this animation!
That was it for this animation! Path commands are quite hard to use at first, but when you get used to it, it's possible to create really animations. Hope you learned something!
-Oli

Oct 30, 2023
A website tutorial featuring the rebuild of a menu from an Awwwards winning website, made with Framer Motion and Next.js, inspired by: https://agencecartier.com/fr
Jul 13, 2023
A website tutorial featuring an animated menu that comes from an awwwards winning website. Features a stair-like animation with an infinite slider. Inspired by https://k72.ca/travail

June 28, 2023
A website tutorial on how to make an Awwwards Navigation bar menu using Nextjs and Framer Motion. Inspired by the awwwards winning website https://props.studiolumio.com/